2D
Nineteen Seventy Five
by Arelys Gonzalez @Sylera · submitted Aug 10, 2011 · 2011 contest
1 / 42
Description
I have known about threadcakes for about a year and a half, and always wanted to join in on the competition, but never had enough time. This year I gave it a go!!!
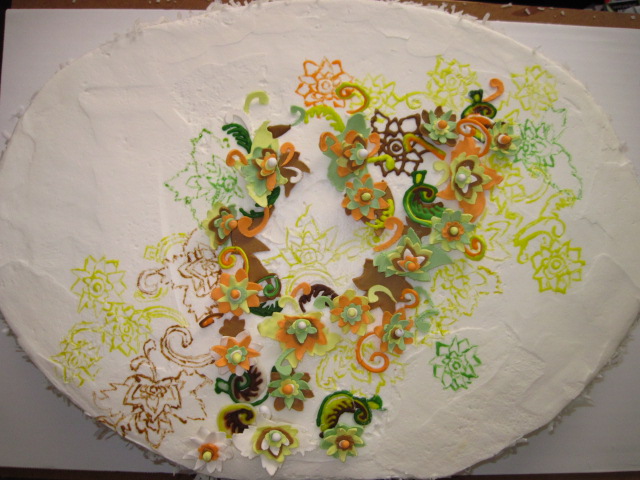
I had picked 3 designs out of the hundreds of designs to choose from, and had every intention to do all three. As time went on I kept falling in love more and more with just one of them, so I decided, with help with my now crazy schedule, that I would do only that ONE! I could see the design popping right out at me as if it was in 3-D, and I love the colors!
I started by coloring gumpaste in brown, green, orange, and lime/yellow. Once that was done I immediately started to make the flowers out of them. Layer by layer, using a technique I call the "pin-prick technique"; you roll out the gumpaste to a thin sheet, put the (enlarged)design over the gumpaste, and using a exacto-knife to "pin-prick" the design of the layer of the flower, then remove the paper, and follow the little dots to remove the shape, pierce it through the floral wire. Repeat for every layer of each flower until you have the entire flower on the wire. Shape and let dry! Yes, this method took me a whole 24 hours to do. Then I went back and used the pinprick technique to make the other small pieces of "commas" and "fillers".
I then started on making royal icing and coloring it in the same 4 colors as for the flowers. And I covered the enlarged design with a clear cutting board, and started piping the "swirlies" in the design, and I did the epic mistake of just making one set of all the "swirlies". I should have made at least 3 sets of them, because of course they break. :/ Anywhoo, I let them dry overnight.
Next, I made the cake! The cake was a coconut white cake, using a recipe from one of my chef instructors in the Culinary school I graduated from! I had to make the recipe 3 times to fill a half sheet pan!
While the cake cooled off, I then made the cake filling, which was coconut pastry cream. It came out DELICIOUS!
After that came the italian butter cream. 3 pounds of it!
With the cake cooled down I started on the easy part; cut the cake into the shape I want it to be (oval), cut the cake into two parts, add the filling to one part, put the "top" on, and cover the cake in buttercream!
Now the fun part is DECORATING! I started by placing the gumpaste "filler" pieces onto the cake, and THEN the flowers. Placing them to replicate the design. I would say the hardest part was to really get the GIRL'S facial features to stand out. Then I add the the royal icing pieces. Last but not least I painted the outlines using royal icing and water, to finish the cake off. Oh yeah, and because it's a coconut cake, I HAD to put coconut flakes on the edge of the cake! Besides, I just HAD to take a big bite when I was done!