3D 1
Surrealist Bird
by Stacy Zimring · submitted Aug 7, 2012 · 2012 contest
1 / 41
Description
This is my first entry for a cake contest. I intended to submit an entry last year, but I only discovered the Threadcakes website after the deadline from a blog by The Cake Engineer, Roxanne, found at www.cakesbyroxanne.com.
THE DESIGN SELECTION & CAKE SUBMISSION SIZE
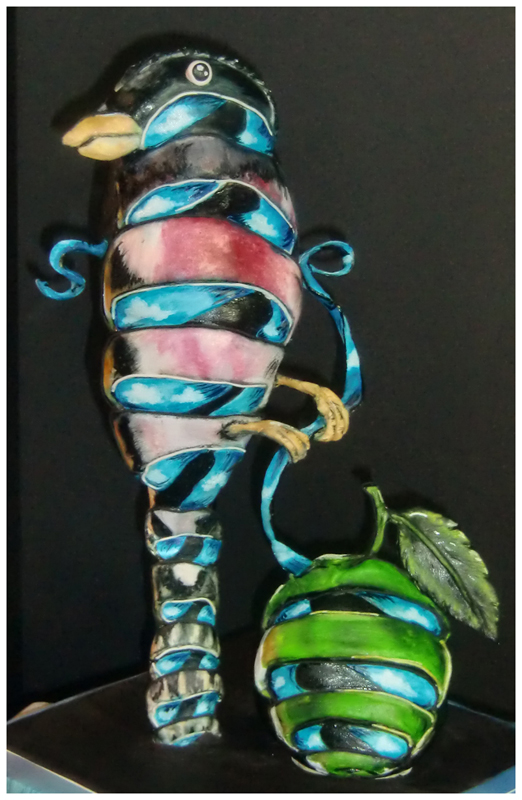
Before purchasing the cake ingredients -- eggs, milk, chocolate ,butter, Fondarific Fondant, and more chocolate , I had to decide what to make and how large to build it. I spent several days scrolling through the Gallery. While I had a few favorites, the Surrealist Bird by Alan Maia grabbed my attention. Although there would be technical obstacles to overcome, I thought it would be a fascinating 3D cake.
At the outset, I enlarged the original design on the computer, printed it out, and taped the pages together to get an idea of my final project size. I needed to figure out how much cake I could handle sculpting in a reasonable amount of time. My final design is 21 inches tall.
CAKE SUPPORT
Since I’m not a magician and cannot bend the laws of physics, I had to make the call to use an internal support; otherwise I could not make the cake float within its endless black background. Additionally, the bird is top heavy. If I did not use an internal support, a one-inch diameter cake circle at about 6.5 inches tall could not support the upper bird body.
To prevent health concerns, I used plumbing pipe covered in medical grade tape which was then smothered with melted chocolate to prevent the edible cake and fondant from having direct contact with the pipe.
CAKE RECIPES
Since this 3D cake was going to require some carving, I selected a cake recipe that would have some body to it and which would not crumble while carving or sink from the weight of fondant atop it. I used both a vanilla and chocolate structures recipe found on CakeCentral.com. This was the first time I did not make a cake from scratch. The happy result is that both recipes are truly amazing. It tastes better than some of my great scratch recipes. Adding instant pudding mix and sour cream to the dry section from a boxed cake product was well received by my taste testers
I made two vanilla batches and one chocolate batch for my overall design. Prior to carving and covering my cakes in fondant, I made chocolate ganache to insert between my cake layers. The benefit of carving cakes is that you get to eat all of your carving bits. The downfall of carving cake is that you get to eat all of your carving bits.
CAKE STACKING
I knew when I started to stack the cake layers that I needed to support them with a cake board in the middle. Otherwise the cake would sag and slide down the internal support. For the bird, I inserted a cake board in the middle of the layers. For the apple, it was not my intention to use an internal support. However, on my first go around, the cake layers slid left and right from the New York humidity and became squashed under the weight of the fondant. Take Two. I made a second apple and used an internal support structure to maintain the design integrity.
Since the bird body is basically sitting on its twisted tail, I used a flange in the middle of the pipe covered with a wad of modeling chocolate as a stopper to make sure the cake layers would not slide to the base board. I then used my round cookie cutter set and cut out different size cake rounds. After alternating cake with ganache, I placed the structure into the refrigerator to cool down and to prevent my layers from sliding.
After cake stacking, it was time to cover the bird and apple in fondant. I knew that both structures had features in the foreground and in the background. I had to decide whether to keep my layers flat and paint in the depth or whether to place layers of modeling chocolate or fondant appliques on top of the cake prior to my fondant layer. I decided to use both methods to represent all the depths within the design.
CAKE DETAILS
Once the body was stacked and covered in fondant, I created the ribbon and the bird claws. For the claws, I attached a loop of covered floral wire to a toothpick which was inserted into the bird body. I had to use the wire since the claws needed to wrap around the ribbon to hold it in the air.
The ribbon was a bit harder to accomplish. With trial and error, I ended up making the ribbon out of gumpaste that hardened for a few days prior to me affixing it to the apple and the bird. I inserted a wooden skewer at each end for insertion. The leaf for the apple was created out of gumpaste.
THE PAINTING PROCESS
Once I had the bird and the apple covered in fondant, I started the painting process. I used black airbrush color to paint all the dark areas of the design. As I was painting the outlines and color blocks which required intense study of the original design, I found that I had to redo some of my fondant overlays as they were not in the right spot. You can see a picture of my fix of the bottom tail portion when viewing the photos. One benefit of using the airbrush color is that the color is consistent whereas a luster dust mixture can vary.
After the black, came the color. I initially tried to dust the bird with luster dusts but I did not like the intensity I was achieving. I decided to airbrush the larger areas and then went back and added details with luster dusts – layer upon layer. I found that if I did not let the color dry between coats, I would smudge what I just spent so much time trying to get right. ALWAYS let your work dry.
THE CARVING
After spending so much time (about 40 hours) trying to get it right, the day cake to carve up my creation and serve it. Although I hated the slicing, everyone enjoyed the cake and being able to see all the layers inside.
Overall, I had a great time making this cake and I look forward to selecting a design to make a 2D cake for the contest this year as well.
THE DESIGN SELECTION & CAKE SUBMISSION SIZE
Before purchasing the cake ingredients -- eggs, milk, chocolate ,butter, Fondarific Fondant, and more chocolate , I had to decide what to make and how large to build it. I spent several days scrolling through the Gallery. While I had a few favorites, the Surrealist Bird by Alan Maia grabbed my attention. Although there would be technical obstacles to overcome, I thought it would be a fascinating 3D cake.
At the outset, I enlarged the original design on the computer, printed it out, and taped the pages together to get an idea of my final project size. I needed to figure out how much cake I could handle sculpting in a reasonable amount of time. My final design is 21 inches tall.
CAKE SUPPORT
Since I’m not a magician and cannot bend the laws of physics, I had to make the call to use an internal support; otherwise I could not make the cake float within its endless black background. Additionally, the bird is top heavy. If I did not use an internal support, a one-inch diameter cake circle at about 6.5 inches tall could not support the upper bird body.
To prevent health concerns, I used plumbing pipe covered in medical grade tape which was then smothered with melted chocolate to prevent the edible cake and fondant from having direct contact with the pipe.
CAKE RECIPES
Since this 3D cake was going to require some carving, I selected a cake recipe that would have some body to it and which would not crumble while carving or sink from the weight of fondant atop it. I used both a vanilla and chocolate structures recipe found on CakeCentral.com. This was the first time I did not make a cake from scratch. The happy result is that both recipes are truly amazing. It tastes better than some of my great scratch recipes. Adding instant pudding mix and sour cream to the dry section from a boxed cake product was well received by my taste testers
I made two vanilla batches and one chocolate batch for my overall design. Prior to carving and covering my cakes in fondant, I made chocolate ganache to insert between my cake layers. The benefit of carving cakes is that you get to eat all of your carving bits. The downfall of carving cake is that you get to eat all of your carving bits.
CAKE STACKING
I knew when I started to stack the cake layers that I needed to support them with a cake board in the middle. Otherwise the cake would sag and slide down the internal support. For the bird, I inserted a cake board in the middle of the layers. For the apple, it was not my intention to use an internal support. However, on my first go around, the cake layers slid left and right from the New York humidity and became squashed under the weight of the fondant. Take Two. I made a second apple and used an internal support structure to maintain the design integrity.
Since the bird body is basically sitting on its twisted tail, I used a flange in the middle of the pipe covered with a wad of modeling chocolate as a stopper to make sure the cake layers would not slide to the base board. I then used my round cookie cutter set and cut out different size cake rounds. After alternating cake with ganache, I placed the structure into the refrigerator to cool down and to prevent my layers from sliding.
After cake stacking, it was time to cover the bird and apple in fondant. I knew that both structures had features in the foreground and in the background. I had to decide whether to keep my layers flat and paint in the depth or whether to place layers of modeling chocolate or fondant appliques on top of the cake prior to my fondant layer. I decided to use both methods to represent all the depths within the design.
CAKE DETAILS
Once the body was stacked and covered in fondant, I created the ribbon and the bird claws. For the claws, I attached a loop of covered floral wire to a toothpick which was inserted into the bird body. I had to use the wire since the claws needed to wrap around the ribbon to hold it in the air.
The ribbon was a bit harder to accomplish. With trial and error, I ended up making the ribbon out of gumpaste that hardened for a few days prior to me affixing it to the apple and the bird. I inserted a wooden skewer at each end for insertion. The leaf for the apple was created out of gumpaste.
THE PAINTING PROCESS
Once I had the bird and the apple covered in fondant, I started the painting process. I used black airbrush color to paint all the dark areas of the design. As I was painting the outlines and color blocks which required intense study of the original design, I found that I had to redo some of my fondant overlays as they were not in the right spot. You can see a picture of my fix of the bottom tail portion when viewing the photos. One benefit of using the airbrush color is that the color is consistent whereas a luster dust mixture can vary.
After the black, came the color. I initially tried to dust the bird with luster dusts but I did not like the intensity I was achieving. I decided to airbrush the larger areas and then went back and added details with luster dusts – layer upon layer. I found that if I did not let the color dry between coats, I would smudge what I just spent so much time trying to get right. ALWAYS let your work dry.
THE CARVING
After spending so much time (about 40 hours) trying to get it right, the day cake to carve up my creation and serve it. Although I hated the slicing, everyone enjoyed the cake and being able to see all the layers inside.
Overall, I had a great time making this cake and I look forward to selecting a design to make a 2D cake for the contest this year as well.