3D 4th place 6
The Observer
by Yenna Susanty · submitted Nov 3, 2014 · 2014 contest
1 / 63
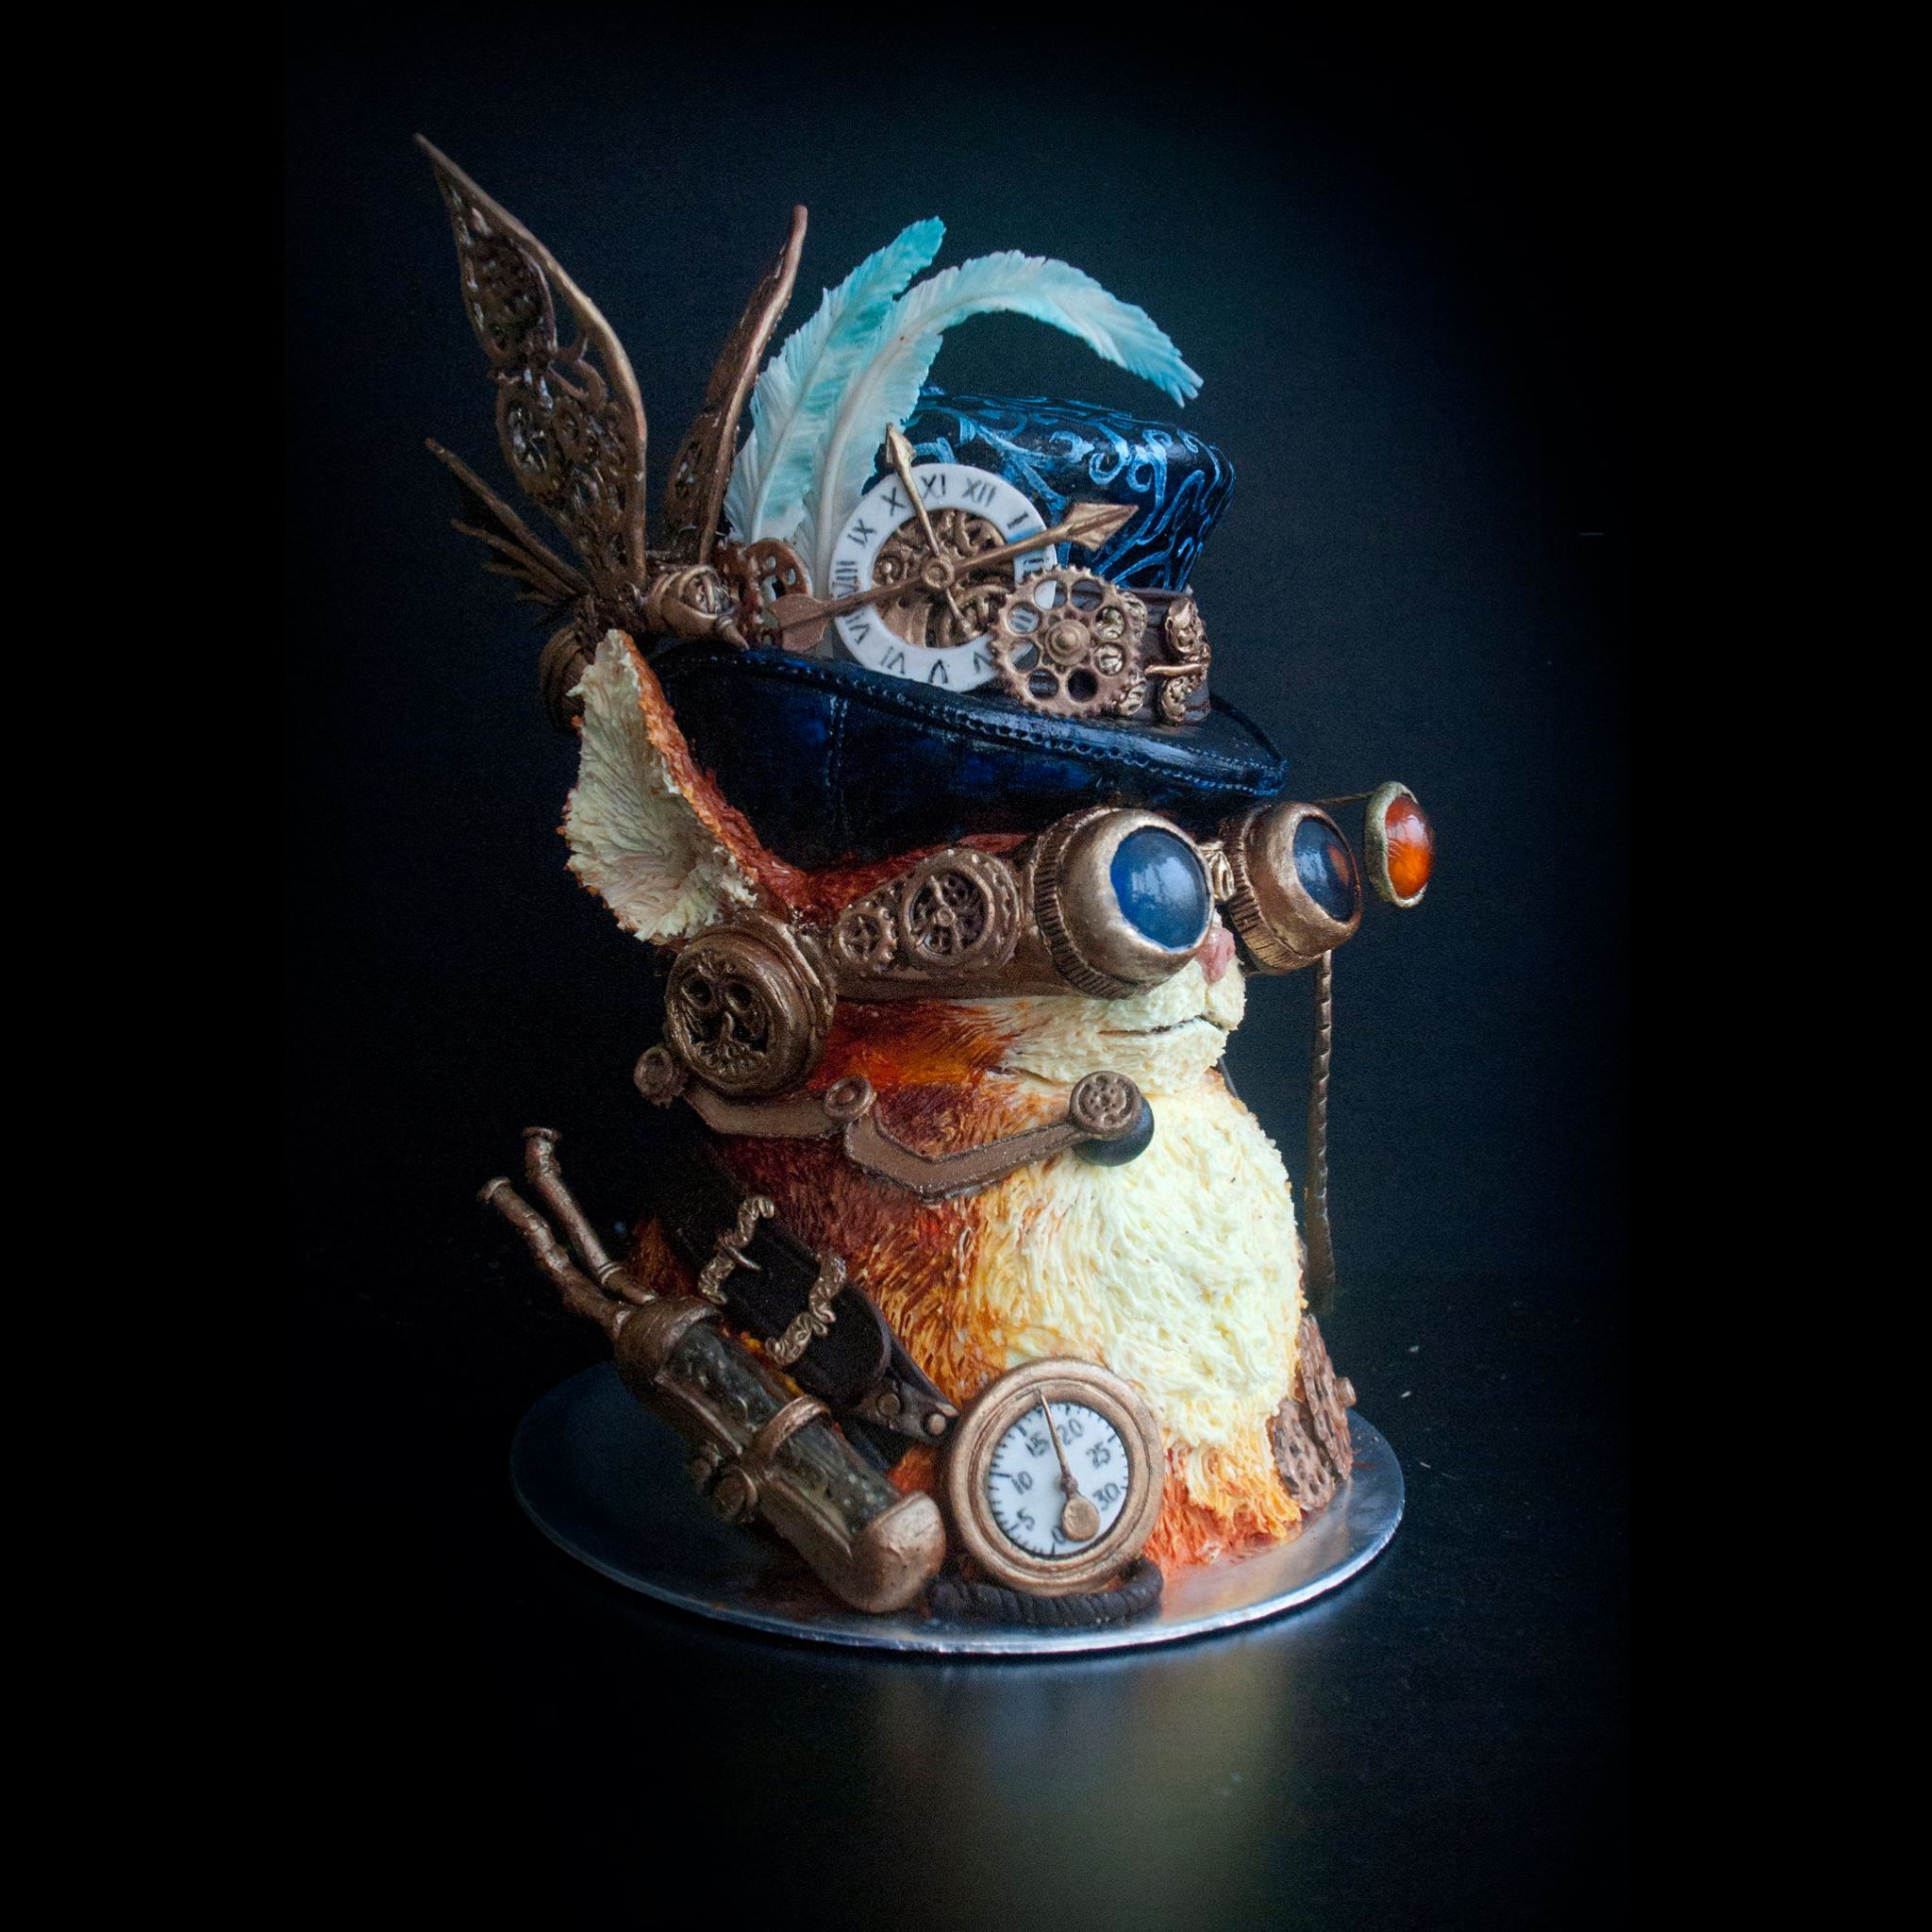
Description
Having only started cake decorating in February this year, I had a lot to learn, and the making of this cake was a LOT of adventure, a LOT of firsts, and a LOT of fun! The details of the drawing was what made me finally settle to choose this design. The more I see it the more I discover. For every element of the design, I had to think of the possible techniques and materials to use.
I started off by figuring out my interpretations of the cake: colour palette, size, etc. and laid down an action plan.
1. Gears and accessories: I made the gears and accessories two weeks ahead. I made 108 gears in all (including 20 on the wings of the butterfly alone!), ranging from 5mm to 6cm diameter, all homemade marshmallow fondant based. A few of the gears have details added on with royal icing. I used various sized round "cutter" (bottle caps, pastry moulds, etc.) to form the larger gears, and used icing tips (at both ends) for the smaller gears and to punch out the teeth on the gear. Then I painted them triple layer with luster dust to achieve that bronzy antique feel - first layer brown, second layer bronze, and third layer -with thin uneven strokes- gold. Waiting to dry between layers was tough. The belt buckles are carved from modelling chocolate.
2. Steampunk butterfly: I had to try making the wings 3 times: first with homemade modelling chocolate, which fell apart quickly, then with homemade marshmallow fondant - the first one cracked as it was too thin, but the second one held! Yay! I stuck the wings together onto a fondant body using edible glue, and had a wire run through it for attachment later. The transparent back was a special challenge. I used tinted gelatine, moulded over an unused cough syrup spoon (my first time using gelatine as decoration). Then I stuck 9 fondant gears onto a modelling chocolate base, fit in the gelatine skin over it, and tie everything in place with a string of fondant. Dried, painted.
3. Steampunk tube tank on the side of the cat: My inexperience with gelatine really showed here. I let gelatine dry on a flat surface, and after sticking 15 gears on modelling chocolate, I tried bending it over the top. First try, the gelatine was too stiff. The softer modelling chocolate couldn't hold it in place. The second try, the gelatine was too soft, and crumpled way too easily. Starting to feel like Goldilocks a little bit, the third try worked well! I fasten them onto place with more modelling chocolate, refrigerated and painted it. I used two half toothpicks to support the chocolate furnace coming out of it.
4. Watch and earpieces: I started inside for both the watch and earpieces by sticking several gears together with water. For the watch, I made the casing with fondant, dried and painted the numbers on before assembling. For the earpiece, I carved the casing from modelling chocolate, and attached it on top of the gears. The gears are hardly visible ear pieces in the end, but it's so gratifying to know that they're there :P!
5. The cake: all accessories done, it was time for the cake itself. I looked up online for the best cake to carve (it is the first time I'm carving a cake). Online forum verdict said that mud cakes are best to carve with, so I baked (my first) chocolate rum mud cake. I initially baked 6 layers of 7" cakes, froze them overnight, and stack them the next day and put 2 wooden dowels in the middle to maintain alignment, and carved away (while nibbling the cut-off pieces of course)
6. The fur: I mixed different shades of yellow to orange to brown with my buttercream, and use it literally like a palette, applying alternate colours onto the cake with a food paintbrush, with a hope to achieve an organic uneven layering effects. I added further texture by running a sharp edge through the fur. I chilled it overnight before messing with the hat.
7. The hat: I covered the hat part of the cake with fondant. It was my first time really covering a complex shape with a single sheet of fondant - and yes there were a few holes, but luckily in all the "right" places that would be covered by the accessories! I used my hooked carving tool to make the stitches impression. Afterwards I painted it with dark blue food colouring. When dried, I painted the swirly patterns using pearl edible paint. The ears are fondant covered in buttercream, and the belt on the hat from modelling chocolate.
8. The oh no moment: So after all that, I started attaching the accessories onto the cake. Then the realisation: the cake is way too short for the amount of accessories I wanted to load on it! After a moment of panic, I baked 2 more layers of mud cakes, and let everything freeze for a night and a day. The next day, without breathing, I pried the cake off its original base, and PLONKED it on top of the 2 additional layers! I never loved my freezer more: both cakes were frozen solid, there were only tiny cracks on the bottom of the icing! I quickly fixed it and covered the bottom layers with buttercream.
9. The goggles: Again, a few tries. First I tried using gelatine. The first one was the right hardness, but shrivelled too much overnight. The second one was too soft and melted in my hands. Then I hunted for isomalt all over Singapore to no avail! So it was time for my first hard candy! I had a lot of fun making it, and ended up doing a few rounds with different colour options. for the smaller lens on the cat's left goggle, I poured the sugar over a formed wire in placed inside the mould, so when it dried, the wire held it like a lollipop. I used white modelling chocolate at the back of the "lenses" to make sure the colours came out, and used dark modelling chocolate on the outer shell.
After all that, the final assembly went quite smooth, with a dab of water here and a dab of edible glue there. I finished the cake in time for my 30th birthday, too! And because it was massive AND rich, all my family, friends and colleagues got a slice. Everybody loved it, the cake stayed very very moist even after a few days in and out of the freezer and fridge. The rum flavour went along very well with vanilla ice cream and raisin toppings.
I put a few composite/photoshopped photos in the submission for clarity, including an obsessive chart of all the different accessories on the cake - I hope this is OK :)
All in all the cake took 3 solid days to assemble, roughly 1 day for the butterfly experiments and another day for the steampunk tube, and a few sporadic hours to do up all the gears. It was definitely the most complex cake I've ever made. I am also using this opportunity it to launch my Facebook page www.facebook.com/onlyYdesignercakes... Hope it's also OK to post the link here! :)
Thank you for reading my rant everybody!! - love, y.