2D 1
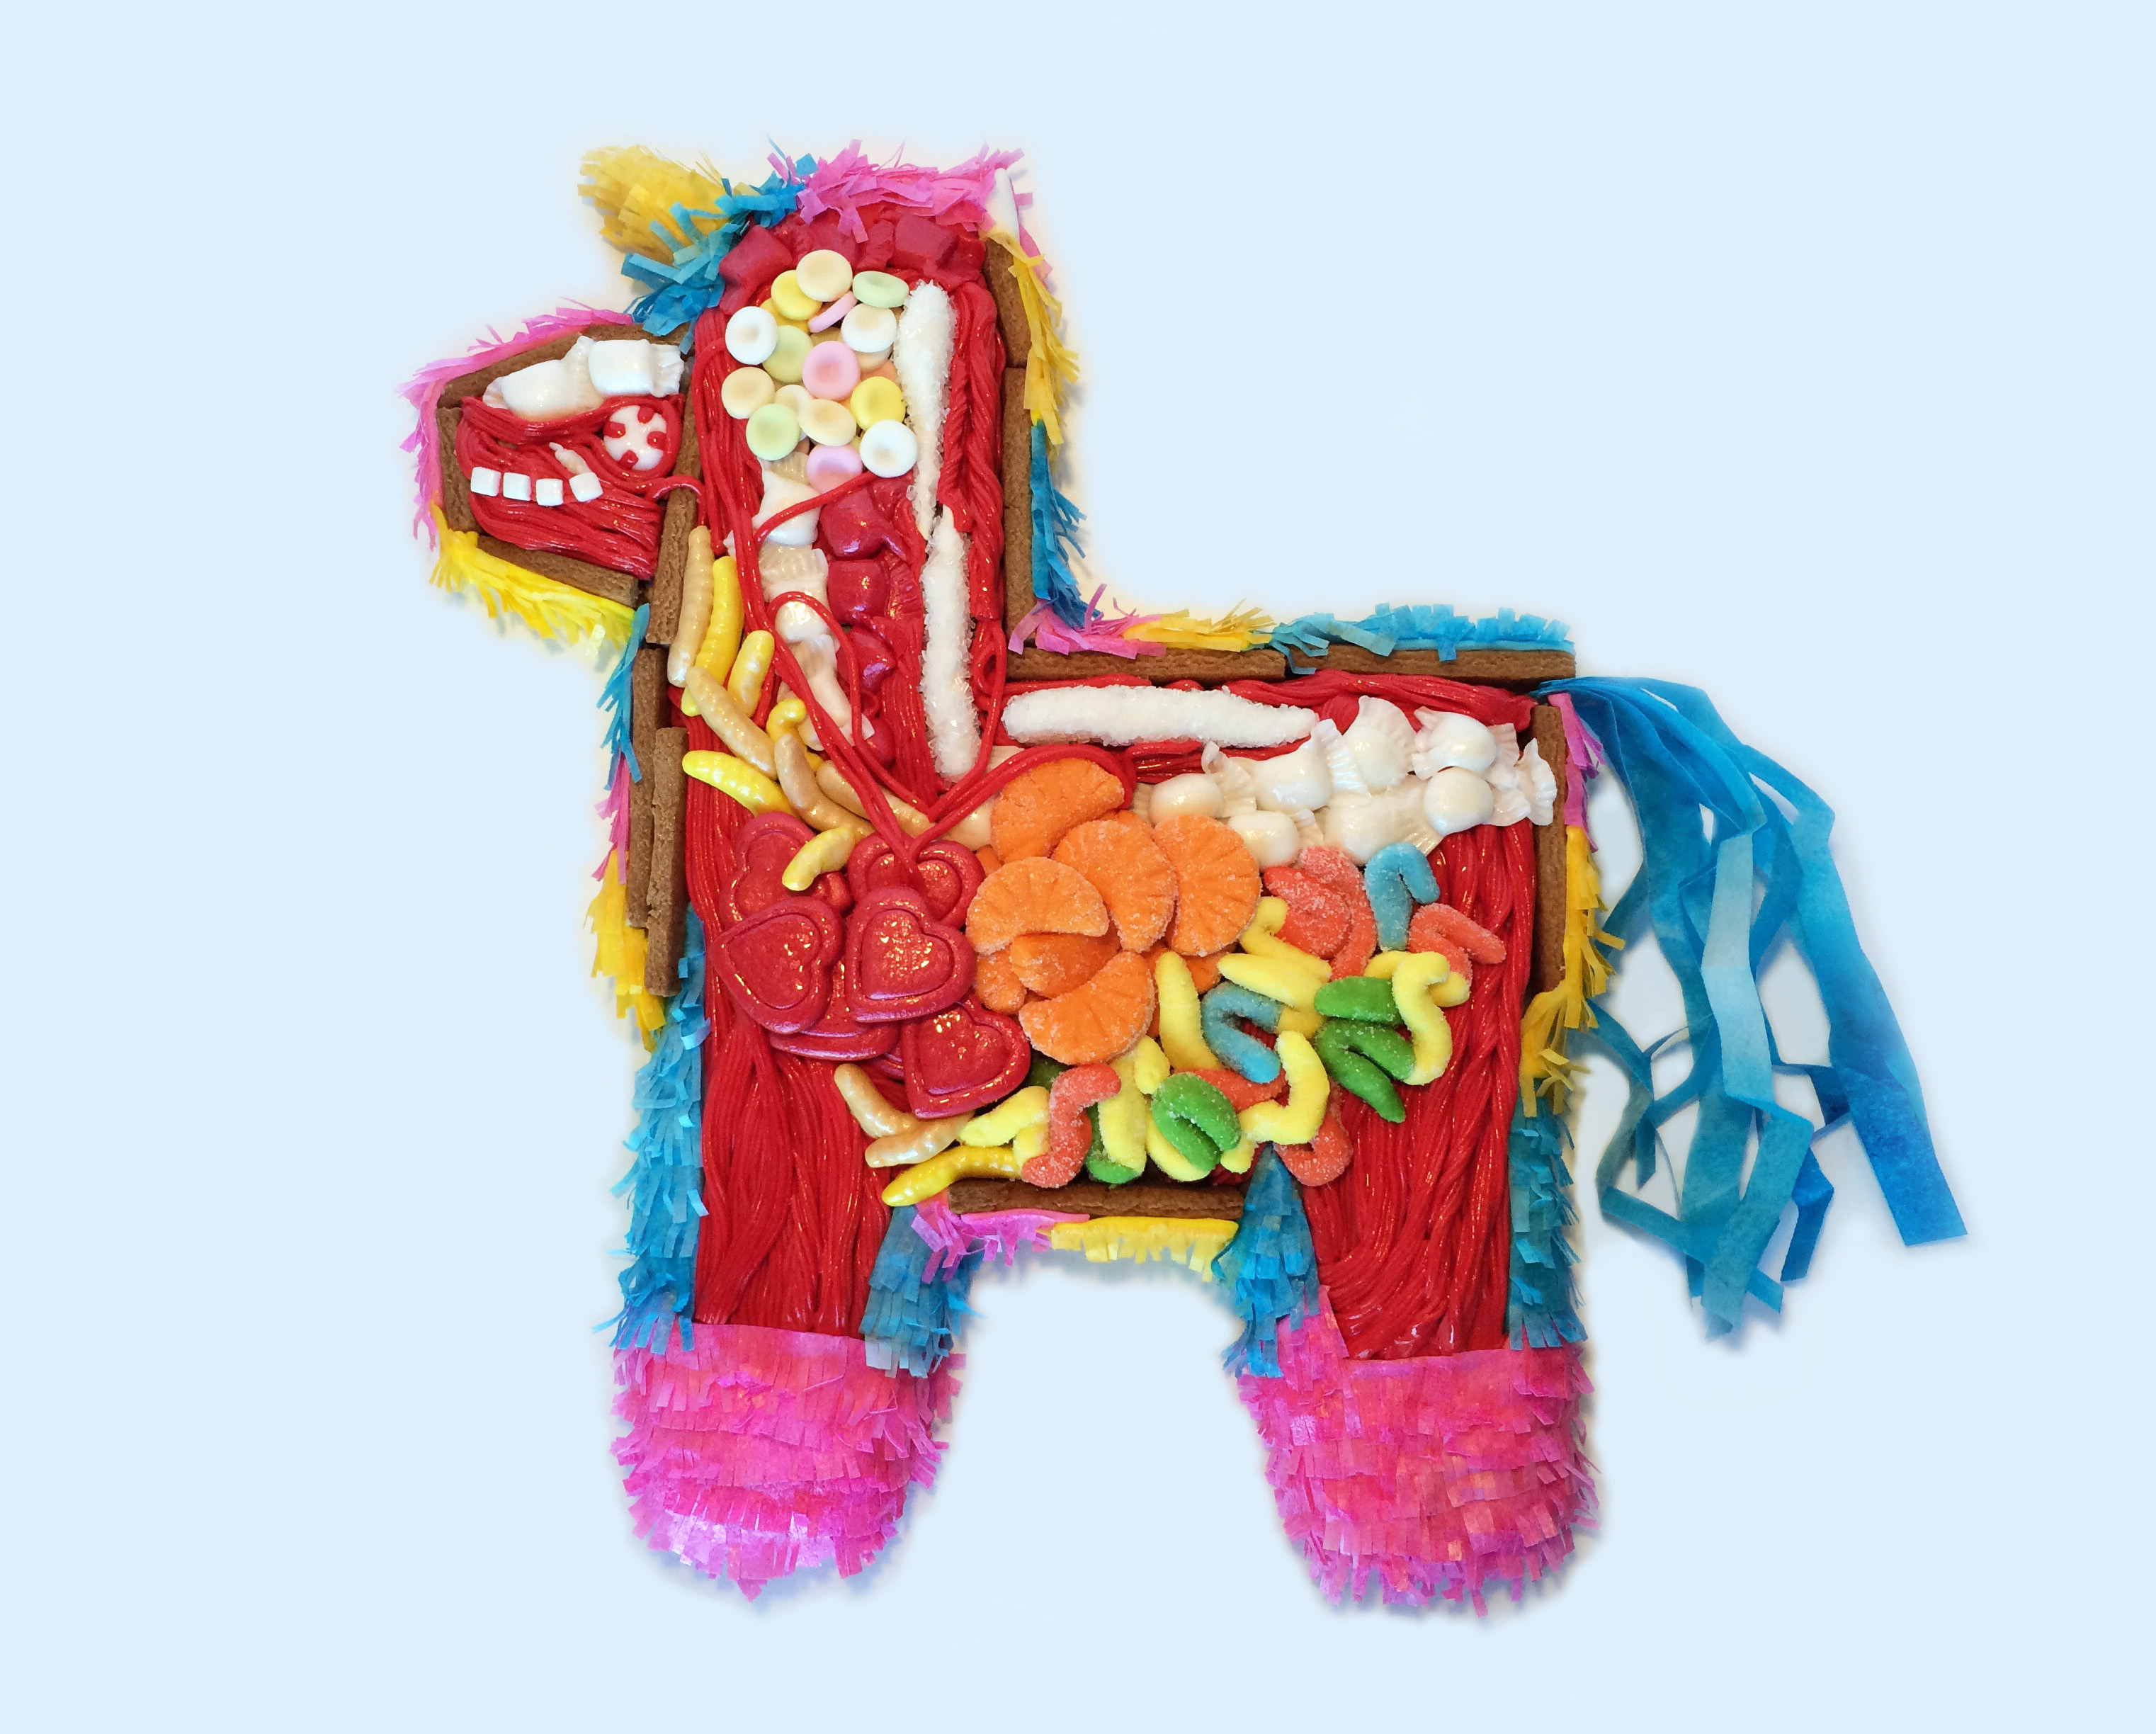
Pinata Anatomy
by Sara Hemenway @SparklyFluff · submitted Nov 18, 2015 · 2015 contest
1 / 50
Description
I have been watching the Threadcakes competition for years, always feeling amazed and intimidated by the winning entries and interested in reading about the processes the cake artists used to create their submissions. In the past I’ve usually been reminded of the contest after the winners have been chosen, too late to enter myself, but this year I paid attention and made sure I would have time to make a cake to submit! After looking through the giant page of all the images I had to choose from and saving my favorites, I picked Piñata Anatomy. Something about it just stuck with me, despite the fact that my style is generally much more whimsical and “cute.”
I began by grabbing a party cake mix from my cupboard, because I was feeling particularly lazy on that day, and also because I figured that the body of a piñata cake should definitely be filled with sprinkles. While it was in the oven, I started making the candy that would go on top. I began with the orange slices, cutting out circles, then cutting them in half and shaping them, and pressing a stylus into the fondant for the texture. After they had partially dried, I brushed them all with a mixture of tylose powder and water and dipped them in granulated sugar. I made the small pastel candies for the brain next, then the white gum squares for the teeth (which I made too large and eventually used as a base for the wrapped candies,) the peppermint candy for the eye and the red “foil” hearts. I brushed those with coral luster dust but they weren’t quite as shiny as I would have liked, so after they dried I painted a mixture of corn syrup, clear alcohol and more luster dust to add more texture and shine. I grabbed a couple of lollipop sticks, (the only non-edible part of the cake,) shaped some white fondant around them, painted them with my “glue” and rolled them in clear sparkling sugar to achieve an approximation of the sugar sticks. After baking, cooling, leveling, and freezing the cake, I carved the piñata shape.
I decided to use graham crackers to mimic the corrugated cardboard around the outside, and after reading through some recipes I picked one to try. I didn’t roll the first half of the dough out as thinly as I would have liked… good thing they were tasty and my 4 year old likes graham crackers! I forgot to take pictures of them after they were baked, but you can see them in the process photos. I whipped up a half batch of my favorite vanilla buttercream and iced the cake, then covered the top of it with some grey marshmallow fondant that was leftover from another cake, not worrying too much about how neat it was since it was just a base layer to put everything on.
After that I spent some time trimming and attaching the graham crackers with buttercream, then finished off all the sides with pink, yellow and blue fondant and placed it around the sides and feet. I added a couple base color details on the head, then took a break for the evening to hang out with some friends.
The next day, I mixed up some red fondant and got out my trusty clay extruder to make the licorice and red strings. I was about ¾ of the way done with the first side when my extruder decided it was done and broke. I was able to manually push a few more strings out but knew I couldn’t continue without a new one.
After doing what I could with the “licorice,” I made the white wrapped candies for the colon area, then started on the sour worms that make up the intestines. The day before I had made a mold out of gum paste by pressing a purchased gummi worm into it. I had spent some time online looking for a mold I could pour gelatin into (for the translucent worms) but everything was so expensive that I didn’t feel it was worth it, even though the visual effect would have been nice. The mold dried overnight, and after making the neon colors I pressed them into the mold, stuck them together, brushed them with my glue and dipped them in sugar, then arranged them on the cake. That was about the time I started feeling like things were really coming together and getting excited! I was really making a cake for Threadcakes!
I bought a new clay extruder (Yay for 50% off coupons from craft stores!) and the next morning I set to work finishing the red licorice. After laying the base layer, I finished the gummi worms and red and white wrapped “candies” and then placed the red strings that made up the veins and arteries. I stacked some more fondant hearts and orange slices on, finished piling the pastel candies into the brain (this was around the time I realized the intentional placement of “smarties” in the original design, ha!) and painted some shiny stuff on the things that needed to be shiny.
And then I waited. Waited for the UPS man to deliver my box that contained a package of wafer paper. I watched some TV, I ate some toast with cheese on it, I played with my son.
Finally it arrived! I took out a sheet, opened up some oil-based candy coloring, grabbed a foam sponge and went to work daubing color onto the wafer paper. Then I cut it into strips, and those strips into smaller strips to mimic the tissue paper on the outside of a piñata. This was my first time working with wafer paper, so I hadn’t known exactly what to expect, but I’m SO glad I decided to use it because I absolutely love how it looks. Once I started applying the strips to the colored fondant I began to get really excited. Like, I texted my husband all in caps excited. I may have done a happy dance or two. My son came into the kitchen and declared, “It’s starting to look like a piñata!” So that was definitely encouraging!
I continued applying strips of wafer paper to the fondant with my tylose glue, accompanied by the dulcet sounds of Jurassic World and my kiddo roaring as he smashed toy dinosaurs together. It ended up taking me about three hours to cut and attach all the strips.
Because the cake board I used wasn’t quite large enough to support the tail, I decided to wait until the next morning (yay natural light!) to finish it so that I could set up the area to take pictures of the finished product and attach the tail once I moved the cake there. After making the tail and setting everything up, I was really displeased with how unprofessional the cake board looked in the photos (I only have my iPhone camera) so for my final picture I edited it out. It isn’t perfect, and I didn’t edit anything else on the cake, but I think it really adds to the effect of the finished product when the ugly board isn’t taking away from the cake.
I'm not sure how long it took me to finish... I spent lots of time going back and forth and I wasn't timing myself. I'm thinking it took 20-25 hours total. Some of that might have been me dancing around my kitchen drinking wine, though. :)
I'm really proud of my very first Threadless cake! Thank you for reading my ramblings. Enjoy the cute pictures of my child eating the cake, the picture he took of me holding the cake (I was impressed) and me looking totally crazy shoving that piñata foot in my mouth. :)