2D
Brazilian Spirit
by Jennifer Bratko @Jennifer · submitted Jul 15, 2010 · 2010 contest
1 / 16
Description
This is my 1st Threadcakes entry!
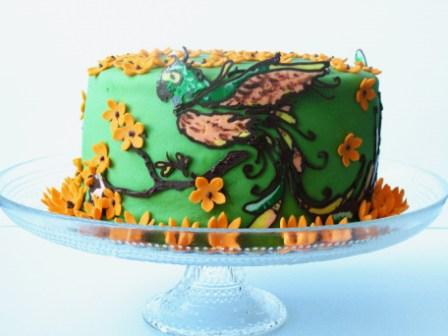
I chose this design because I could picture it on a cake - and I've been wanting to attempt something like this for a while. I started with an 8" red velvet cake that I had in the freezer as a "test" cake to practice my fondant work, and what better way to use it? Anyway, this is a from-scratch red velvet cake using an old southern recipe, and is probably the most tasty cake I make. I also make the marshmallow fondant and the buttercream from scratch.
For the parrot, at first I was going to do a buttercream transfer. I taped a 'shopped pic of the parrot onto a cakeboard then covered it in cellophane. Then I changed my mind - I wanted the head and wing to extend up the side of the cake and buttercream would not have stood up the way I wanted, so I decided to try my hand at chocolate (instead of making it out of gumpaste or fondant). I used dark and white chocolate melting wafers. I traced out the parrot in dark chocolate then filled in the detail with colored white chocolate. This didn't take nearly as long as I thought it would!
Next step, cut my cake into 4 layers, I made a batch of Swiss meringue buttercream and frosted the cake. I also made a batch of vanilla marshmallow fondant and dyed it green and orange. While the buttercream was setting up in the fridge a bit I started cutting out 2 different size flowers out of my orange marshmallow fondant (with a little store-bought gumpaste mixed in for a little stability), then I rolled out the green fondant and covered the cake.
The chocolate parrot was applied it like I would a fondant appliqué, slowly pressing it into the fondant while brushing the back of the chocolate with a little water to get it to stick, and slowly peeling off the cellophane. I was really REALLY happy that a lot of the detail, especially the swirls and longer strands of chocolate actually came out and didn't break! I did end up having to break a few sections of the tail to make it all fit and still swoop off the top lip of the cake. I added the flowers, filled in the middles with more melted chocolate, added a few little dark chocolate shading to the wings and belly of the parrot and did the additional swirl/vine pattern extending around the back of the cake with the melted chocolate and VOILA!
This all took around 6 hours from start to finish, and it's so pretty I don't want to cut into it!
Baker’s site: www.fromscratchsf.com