3D
Dress to Impress
by Miriam Gaulton @mizza · submitted Aug 8, 2010 · 2010 contest
1 / 86
Description
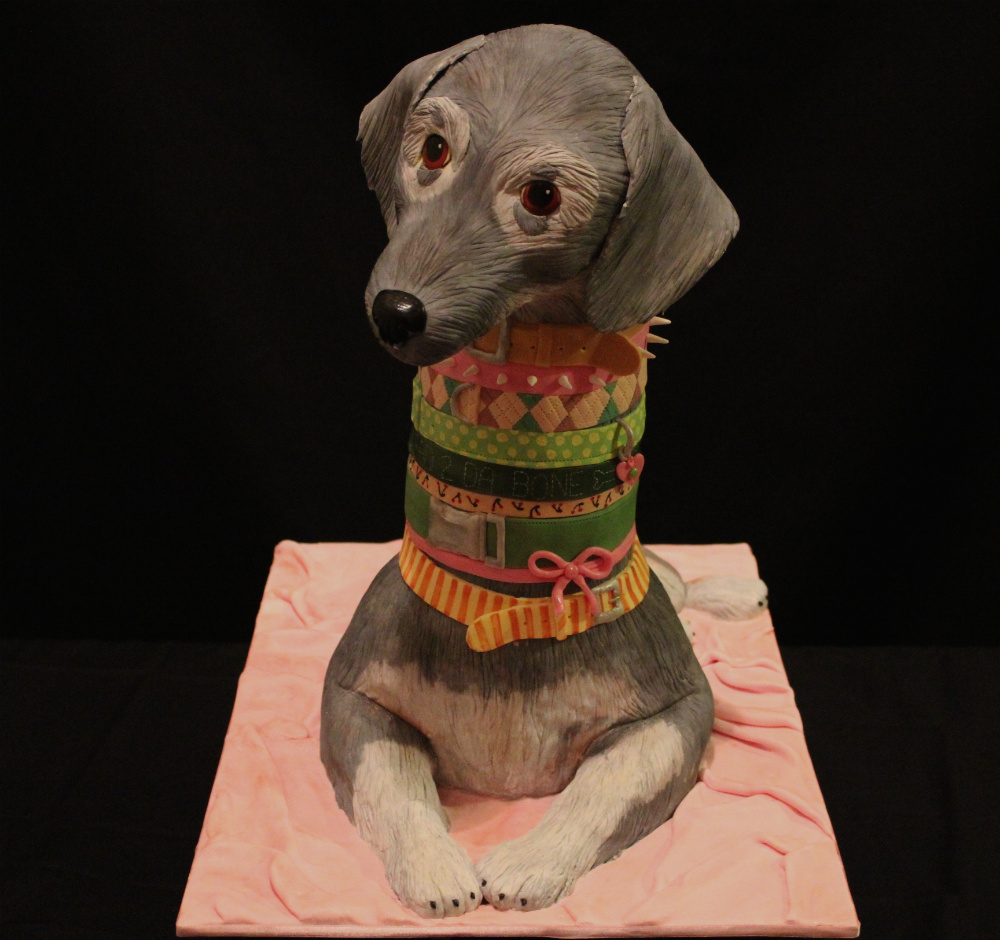
Overall this cake took me about 30 hours from baking to finish, over the course of a week. I chose this design as I think it's cute and posed a challenge! Originally I was going to use buttercake simply for the reduced cost but realised it wouldn't have held up the shape so went instead for chocolate mudcake. I baked 4 cakes (and still wasn't entirely sure this would be enough!)which including the ganache I used nearly 3kg of dark chocolate.
To shape I used one whole cake to carve the head out of, I was going to use rice krispies as they are lighter but thought I'd see how a head of cake would hold up (luckily it did!). For the neck I used 2 cakes and a circle cutter to build up the height then stacked them together ontop of the last cake. Using all the cutoffs it was then a matter of sculpting the body to the right shape. For support I have used one long wooden dowel inserted into the neck down through the shoulders, which the head then sits ontop of, and a skewer is inserted through the head from the nose to the back to hold the nose on (it started falling off straight away). Once carved I then spread ganache over the whole of the cake to stick it together and provide a surface for the fondant.
After setting the ganache for a night I found the head had drooped a little bit due to the weight, so applied more ganache and just really hoped it would hold up! Was very nervous through the decorating process as thought at any moment the head might fall off! After smoothing the ganache I then covered the cake with fondant in three stages - the body, the neck and the head. This gave me time at each stage to texture the 'fur' and add features before the fondant dried. I rolled a cutting wheel continuously over the body to give the look of fur.
Once all features were on I then started painting the whole cake, which is really just like painting ceramics only your using edible paint. Base colour is applied and then lighter/darker colours are drybrushed on to give more of an effect. Nose and eyes are painted on and then onto the collars!
It took me just as long to do the collars as it did the whole dog as there was lots of little details. As the photos show I started from the shoulder and worked up the neck, colouring the fondant and applying the base colours. Then I painted all the details on the collars and modelled the spikes, tag, rings etc. Edible silver colour is used on the buckles.
Once collars were done I made the tail and the ears out of fondant and stuck them to the cake, using a stick of spaghetti to hold the tail up, and then painted them in same way as rest of body. Using pink coloured fondant I added drapes around the cake. To finish off I used an edible glaze to add shine to the eyes and nose, aswell as some of the features on the collars.
I am very happy with the finish! One of my real life dogs was not impressed however when he saw me through the window taking photos, he mistook the cake for a random dog that had come in to raid his home and gave it a big telling off! I have included a photo of him (his name is Buzz) next to the cake dog (don't worry he didn't touch it!) which shows his eventual acceptance of it!
The final chapter of the story is the cutting and eating of the cake. I confess I delayed this part for a couple of days before finally taking it to work so my workmates can demolish it! I didn't enjoy the actual cutting, I usually refuse to cut my own cakes, but I did it! Chocolate mudcake never tasted so good!
The hardest part in the whole process was actually remembering to take photos! I had to stick notes everywhere to remind me to keep stopping what I was doing a take a quick photo!
Thankyou for reading my story and for the chance to create such a cake that I may not have normally come up with! Whatever happens I wish everyone the best of luck and hope you all enjoyed the experience as much as I did!