3D
The Apple
by laura edwards @ChicCakeLady · submitted Aug 17, 2010 · 2010 contest
1 / 97
Description
I saw this competition and thought it was right up my street as I love creating cakes for friends and family and started experimenting with sculpted cakes 2 years ago. I am self taught and therefore love to challenge myself and try new ideas.
The tricky part was choosing which design I would recreate, I knew I wanted to do a 3D cake so I chose my favourite 8 designs and posted them on to my Chic Cakes facebook page. I asked the people who "like" my cakes to choose their favourite or the one they'd most like to see as a cake. The Apple won by 4 votes (it was very tense)I was definitely happy with the outcome. I think I realised it had been my fave all along.
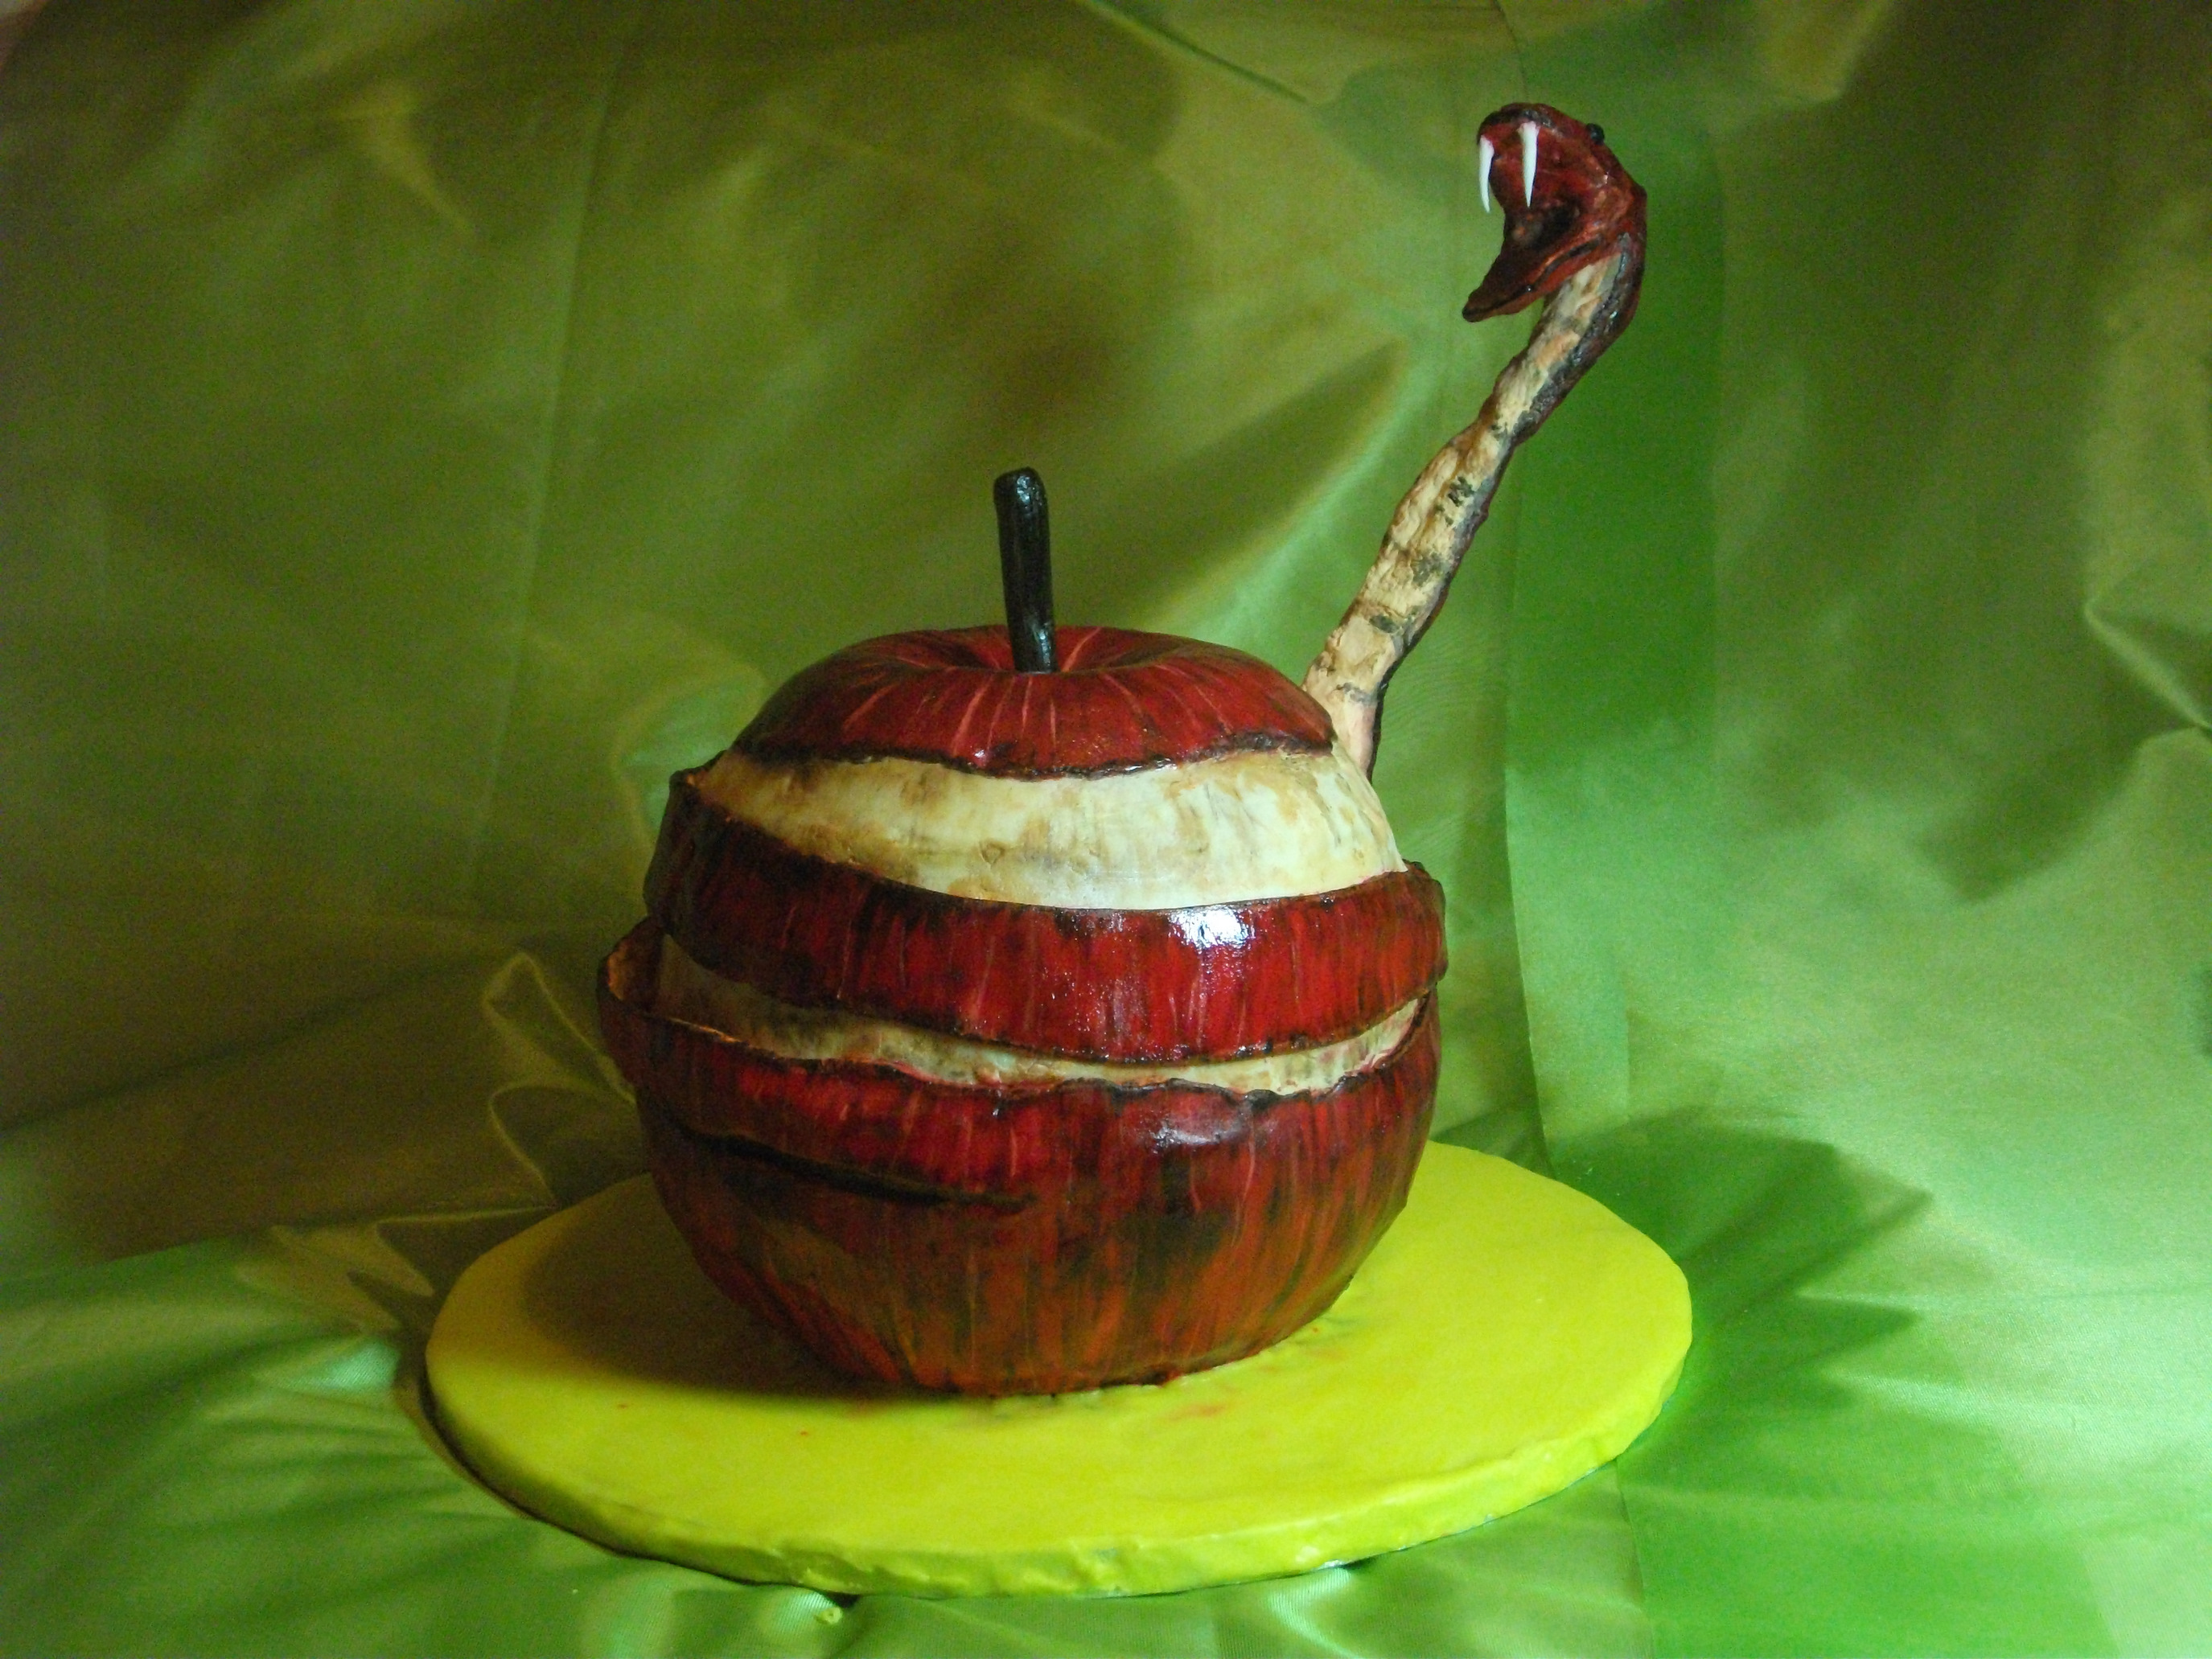
I baked 3 vanilla Madeira cakes, an 8" round and 2 large pudding bowls. Madeira is a nice moist, dense cake perfect for stacking and carving; these were then stacked and sandwiched together with all butter vanilla butter-cream, then carved down into an apple shape. Then I coated the cake in butter-cream ready for the fondant.
I covered the middle band of the cake in white fondant and the base and top in red fondant. I then left it to dry ready for painting and detail work.
Once it had dried I noticed the red paste at the top came too far down the cake, so I cut some away to better match the design.
Haha error number 1 - should have done that before the fondant dried, I then had red stains on the apple flesh!!
On looking at the cake from a distance the white flesh was too prominent in comparison to the skin, so I decided to "peel" away the top layer of fondant in a spiralling motion around the cake. This created peel lines on the cake and got rid of the red stains at the same time - crisis averted!!
I peeled an apple to work from, and then used caramel and ivory pastes to paint the browning marks, and a cream paste mixed with a pale yellow powder to paint over the top, with a bit of shimmer powder to create some depth and porosity?!? (is that a word?).
Red EXTRA paste was used to paint the skin all over.
I inserted coated food grade wires lightly into the cake and wrapped them in red modelling paste outside and white gum paste inside.
I inserted some wires into the cake to support the snakes body, which I moulded from gum paste and supported it with a small vase whilst it dried. I made the snakes head out of gum paste and left that to dry too. Oh and I made a gum-paste stalk too which I attached with glue when dry.
Then CAKE MARE happened!! (error number 2) - any professional would have seen it coming but in my naivety I thought the wires would hold the snakes head up!! It was lolling forward, the peel was breaking, (my throat became dry). I panicked and pushed a supporting skewer through the head and into the body.....and out of the underneath side of the cake (by then my hands were clammy). I decided to wrap fondant around it and jam the head on to the skewer, the head was cracking and the body was cracking (hot sweats had started), so I plumped for taking the snake off the cake and remaking it, when I did that the icing came off and revealed the cake underneath (palpitations kicked in right about there!!)
I walked off, I swore a lot, (I maybe even cried a little). Then I went back to it, rethought it and built the snakes body on to the cake around an inserted wooden skewer and built the head on as part of it. I patched the peel and apple flesh with white fondant. Thankfully it worked, and was ready for painting a bit later on.
I painted the rest of the flesh and the snake, then added pale yellow highlights to the skin, glazed the skin and snake with confectioners glaze. Then added some dark brown lowlights and outlined the skin and snake. Re glazed it again to get it super shiny compared to the matt skin.
I then painted the stalk and added black piping icing to the eye sockets to bring the beady eyed little snake to life. The final touch on him were his gum-paste fangs which were glued in place.
The board was then coated in thick yellow glacé icing (water icing I think it is in USA??) and was ready for its close up.
So that's it, sorry fro wittering on and apologies for the mess of my work area with my kids and dining table in the background, I am trying and failing to get finance for kitchen extension (I currently have a shoebox) in order for me to start up a business. The pictures look a bit chaotic compared to some of the others, hope that doesn't matter?
We then cut the cake up (I whimpered a little haha) and my husband and the kids really enjoyed the delicious moist buttery vanilla madeira complete with the silky smooth vanilla buttercream. Had I have had more time I perhaps in hindsight would have made apple cake - but you live and learn don't you?
There are some AMAZING creations in the competition and I am just so happy to have found out about it and been part of it this year. It was great fun (if a little stressful in places) and I wish loads of luck to all the super talented contestants. :)
The tricky part was choosing which design I would recreate, I knew I wanted to do a 3D cake so I chose my favourite 8 designs and posted them on to my Chic Cakes facebook page. I asked the people who "like" my cakes to choose their favourite or the one they'd most like to see as a cake. The Apple won by 4 votes (it was very tense)I was definitely happy with the outcome. I think I realised it had been my fave all along.
I baked 3 vanilla Madeira cakes, an 8" round and 2 large pudding bowls. Madeira is a nice moist, dense cake perfect for stacking and carving; these were then stacked and sandwiched together with all butter vanilla butter-cream, then carved down into an apple shape. Then I coated the cake in butter-cream ready for the fondant.
I covered the middle band of the cake in white fondant and the base and top in red fondant. I then left it to dry ready for painting and detail work.
Once it had dried I noticed the red paste at the top came too far down the cake, so I cut some away to better match the design.
Haha error number 1 - should have done that before the fondant dried, I then had red stains on the apple flesh!!
On looking at the cake from a distance the white flesh was too prominent in comparison to the skin, so I decided to "peel" away the top layer of fondant in a spiralling motion around the cake. This created peel lines on the cake and got rid of the red stains at the same time - crisis averted!!
I peeled an apple to work from, and then used caramel and ivory pastes to paint the browning marks, and a cream paste mixed with a pale yellow powder to paint over the top, with a bit of shimmer powder to create some depth and porosity?!? (is that a word?).
Red EXTRA paste was used to paint the skin all over.
I inserted coated food grade wires lightly into the cake and wrapped them in red modelling paste outside and white gum paste inside.
I inserted some wires into the cake to support the snakes body, which I moulded from gum paste and supported it with a small vase whilst it dried. I made the snakes head out of gum paste and left that to dry too. Oh and I made a gum-paste stalk too which I attached with glue when dry.
Then CAKE MARE happened!! (error number 2) - any professional would have seen it coming but in my naivety I thought the wires would hold the snakes head up!! It was lolling forward, the peel was breaking, (my throat became dry). I panicked and pushed a supporting skewer through the head and into the body.....and out of the underneath side of the cake (by then my hands were clammy). I decided to wrap fondant around it and jam the head on to the skewer, the head was cracking and the body was cracking (hot sweats had started), so I plumped for taking the snake off the cake and remaking it, when I did that the icing came off and revealed the cake underneath (palpitations kicked in right about there!!)
I walked off, I swore a lot, (I maybe even cried a little). Then I went back to it, rethought it and built the snakes body on to the cake around an inserted wooden skewer and built the head on as part of it. I patched the peel and apple flesh with white fondant. Thankfully it worked, and was ready for painting a bit later on.
I painted the rest of the flesh and the snake, then added pale yellow highlights to the skin, glazed the skin and snake with confectioners glaze. Then added some dark brown lowlights and outlined the skin and snake. Re glazed it again to get it super shiny compared to the matt skin.
I then painted the stalk and added black piping icing to the eye sockets to bring the beady eyed little snake to life. The final touch on him were his gum-paste fangs which were glued in place.
The board was then coated in thick yellow glacé icing (water icing I think it is in USA??) and was ready for its close up.
So that's it, sorry fro wittering on and apologies for the mess of my work area with my kids and dining table in the background, I am trying and failing to get finance for kitchen extension (I currently have a shoebox) in order for me to start up a business. The pictures look a bit chaotic compared to some of the others, hope that doesn't matter?
We then cut the cake up (I whimpered a little haha) and my husband and the kids really enjoyed the delicious moist buttery vanilla madeira complete with the silky smooth vanilla buttercream. Had I have had more time I perhaps in hindsight would have made apple cake - but you live and learn don't you?
There are some AMAZING creations in the competition and I am just so happy to have found out about it and been part of it this year. It was great fun (if a little stressful in places) and I wish loads of luck to all the super talented contestants. :)
Baker’s site: www.chiccakes.co.uk